
If you’ve been searching for an easy sweet potato pie recipe that rivals the famous Kimmy Kreations version, you’re in the right place!
This copycat Kimmy Kreations sweet potato pie recipe delivers that signature silky-smooth filling with warm spices that make every bite feel like a warm hug. Learning how to make Kimmy Kreations sweet potato pie at home is easier than you think, and the results are absolutely worth it.
This sweet potato pie recipe uses simple ingredients and a foolproof roasting method to create a dessert that’s perfect for holidays, family gatherings, or whenever you’re craving something soul-satisfying and delicious.
What is Kimmy Kreations Sweet Potato Pie Recipe and How Does It Taste?
This Kimmy Kreations sweet potato pie recipe tastes like pure comfort in every bite.
The roasted sweet potatoes create a naturally sweet, earthy base that’s enhanced by warm cinnamon, ginger, and nutmeg.

The filling has a velvety custard-like texture that melts on your tongue, with just the right balance of sweetness and spice.
The buttery, flaky crust adds a perfect contrast to the creamy filling, while the evaporated milk gives it that signature richness. It’s not overly sweet-just perfectly balanced with subtle caramel notes from the roasted sweet potatoes.
Kimmy Kreations Sweet Potato Pie Ingredients and Kitchen Utensils
For the Filling (makes one 9-inch pie):
- 2 pounds whole sweet potatoes (raw weight)
- ¾ cup granulated sugar
- 2 large eggs (room temperature)
- 1 cup evaporated milk
- 2 teaspoons vanilla extract
- ¾ teaspoon ground cinnamon
- 1 teaspoon ground ginger
- ¼ teaspoon ground nutmeg
- Small pinch of salt (optional)
For the Crust:
- 1 unbaked 9-inch pie crust (homemade or store-bought deep-dish)
- Parchment paper and pie weights (or dried beans)
Optional for Serving:
- Whipped cream
Kitchen Utensils
- Baking sheet
- Aluminum foil
- Fork
- Food processor
- Large mixing bowl
- Whisk
- 9-inch pie dish
- Wire cooling rack
- Spatula
Preparation and Cooking Time
Prep Time: 25 minutes
Roasting Time: 1 hour
Cooling Time: 30 minutes
Baking Time: 55 minutes
Total Time: Approximately 2 hours 50 minutes
Servings: 8-10 slices
How to Make Kimmy Kreations Sweet Potato Pie: Step-by-Step Instructions
Step 1: Roast the Sweet Potatoes
Preheat your oven to 375°F (190°C). Pierce the 2 pounds of sweet potatoes several times with a fork to allow steam to escape. Place them on a foil-lined baking sheet and roast for about 1 hour, or until they’re very tender when pierced. Roasting concentrates the natural sugars and removes excess moisture-this is the secret to avoiding a watery, soggy pie! Let them cool for about 30 minutes before handling.
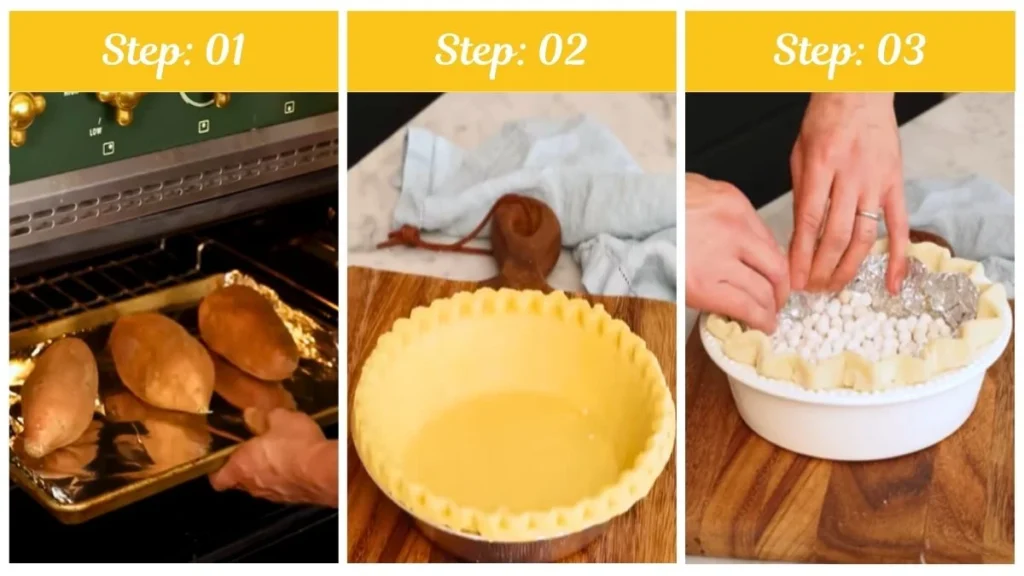
Step 2: Prepare and Blind-Bake the Crust
While the sweet potatoes cool, prepare your pie crust. Preheat your oven to 425°F for homemade crust or 400°F for store-bought. Line the unbaked crust with parchment paper and fill with pie weights or dried beans, pressing them firmly against the sides. Blind bake for 20 minutes until the crust is lightly golden and crisp. Remove the weights and parchment carefully-this par-baked crust will prevent sogginess later. Keep the oven at 400°F for baking the filled pie.
Step 3: Make the Silky Filling
Once the sweet potatoes are cool enough to handle, peel off the skins (they should slip right off). Place the sweet potato flesh in a food processor and pulse until completely smooth and creamy-this eliminates any fibrous texture. Transfer about 2½ cups of the pureed sweet potatoes to a large mixing bowl.
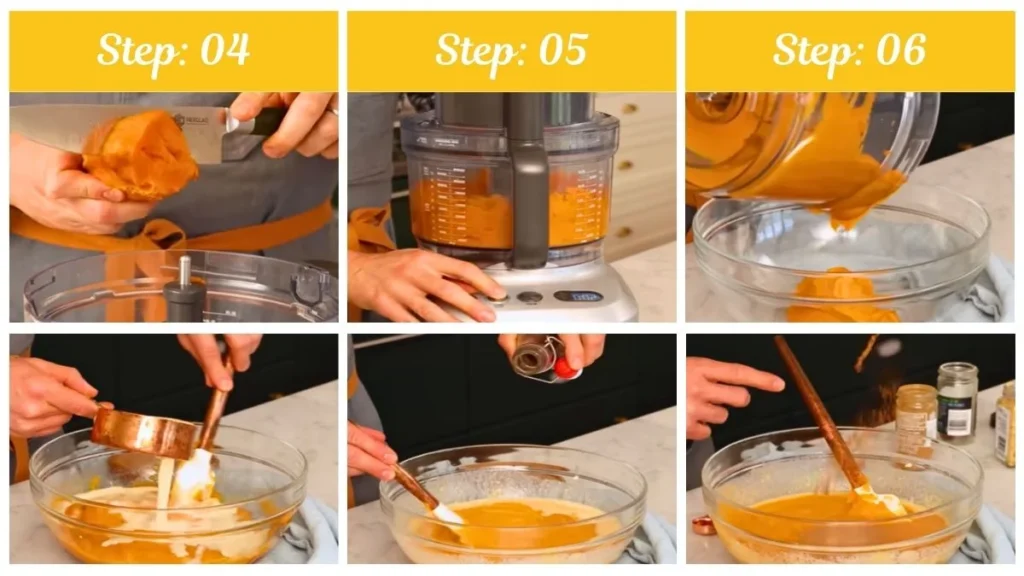
Step 4: Combine the Ingredients
Add the granulated sugar, room-temperature eggs, evaporated milk, vanilla extract, cinnamon, ginger, nutmeg, and optional salt to the sweet potato puree. Whisk gently until smooth and well combined. Avoid over-whisking or using a blender at this stage, as incorporating too much air can cause the pie to puff up, crack, or lose its creamy texture during baking.
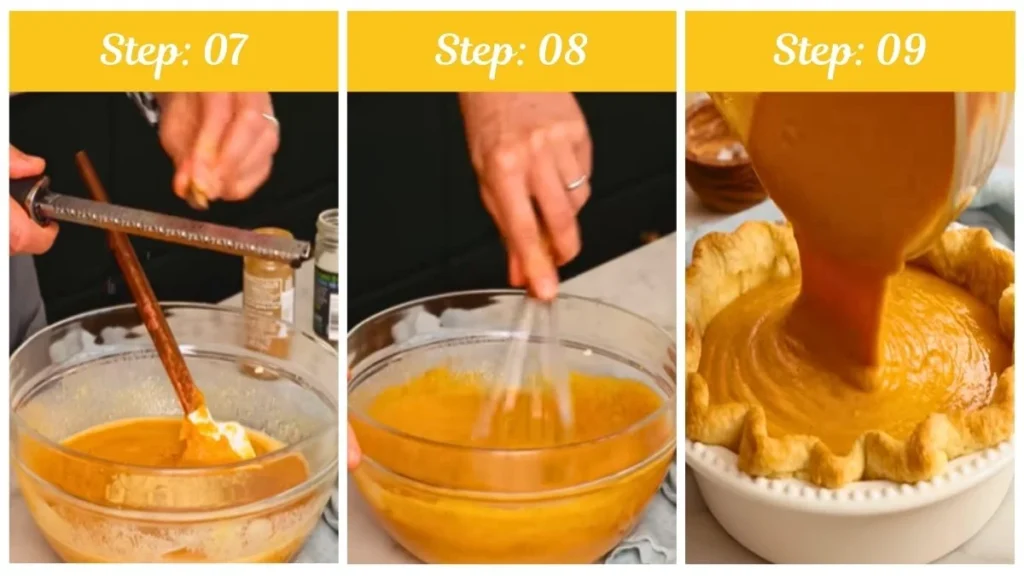
Step 5: Assemble and Bake
Pour the filling into the warm par-baked crust. Gently shimmy the pie dish to settle the filling evenly, and smooth the top with a spatula if desired. Bake at 400°F for 15 minutes, then reduce the temperature to 350°F and continue baking for an additional 40 minutes. The pie is done when the edges are set and puffed, but the center still has a slight wobble like Jell-O. If the crust edges brown too quickly, cover them loosely with foil.
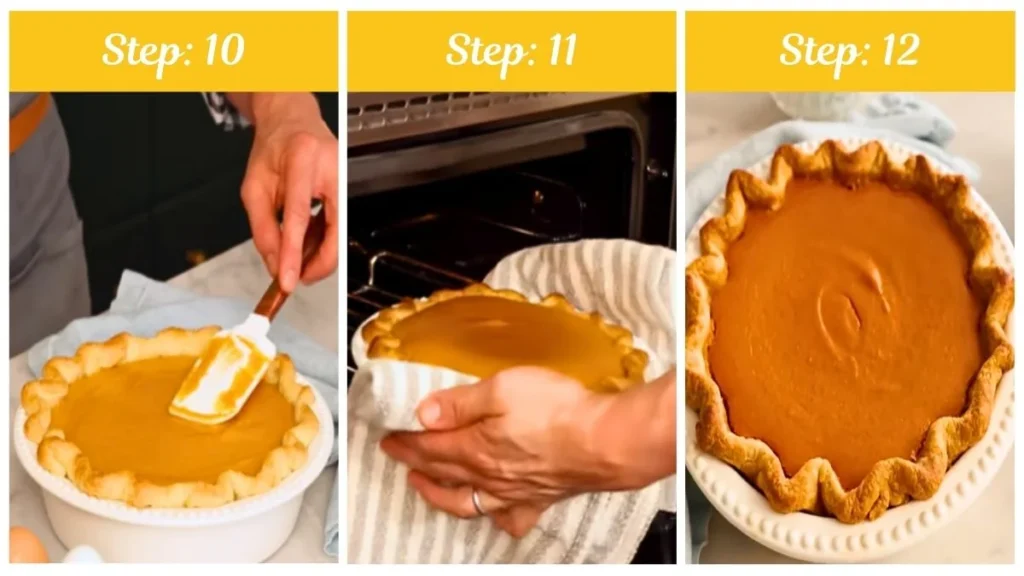
Step 6: Cool and Serve
Remove the pie from the oven and let it cool completely on a wire rack for several hours-this allows the custard to set properly. Slice and serve with a generous dollop of whipped cream. Store any leftovers covered in the refrigerator.
Customization and Pairing Ideas for Your Sweet Potato Pie
1. Brown Sugar Swap for Deeper Flavor
Substitute the granulated sugar with brown sugar for a more molasses-rich, caramelized taste that pairs beautifully with the roasted sweet potatoes. This variation adds depth and complexity to your easy sweet potato pie recipe.
2. Bourbon-Spiked Filling
Add 2 tablespoons of bourbon to the filling mixture for a sophisticated, adult twist on this copycat Kimmy Kreations sweet potato pie recipe. The bourbon enhances the warm spices and adds a subtle depth that’s perfect for holiday dinners.
3. Pecan Streusel Topping
Create a crunchy contrast by adding a pecan streusel topping during the last 20 minutes of baking. Mix chopped pecans with brown sugar, butter, and a pinch of cinnamon for a praline-like finish that elevates this sweet potato pie recipe to bakery status.
4. Maple Whipped Cream
Instead of plain whipped cream, fold pure maple syrup into freshly whipped cream for serving. The maple flavor complements the sweet potatoes naturally and adds an extra layer of seasonal warmth.
5. Coconut Milk Variation
For a dairy-free version of how to make Kimmy Kreations sweet potato pie, substitute the evaporated milk with full-fat coconut milk. This creates a slightly tropical twist while maintaining the creamy custard texture.
6. Pairing with Beverages
Serve this sweet potato pie recipe alongside hot spiced cider, chai tea, or coffee for a cozy dessert experience. For special occasions, pair it with a glass of dessert wine like Moscato or a bourbon-based cocktail.

7. Ice Cream Addition
Transform each slice into a decadent dessert by serving it warm with a scoop of vanilla bean or butter pecan ice cream. The temperature contrast and creamy textures make this an unforgettable treat that showcases why this copycat Kimmy Kreations sweet potato pie recipe is so beloved.
Expert Tips for Perfect Sweet Potato Pie Every Time
1. Always Roast, Never Boil Your Sweet Potatoes
The roasting method in this easy sweet potato pie recipe is non-negotiable for achieving the best flavor and texture. Boiling sweet potatoes introduces excess water that creates a soggy, watery filling. Roasting caramelizes the natural sugars and concentrates the flavor while keeping the right moisture balance for a creamy, not runny, custard.
2. Use Room Temperature Eggs for Smooth Incorporation
Cold eggs don’t blend as smoothly into the sweet potato mixture and can create a lumpy filling. Let your eggs sit at room temperature for 30 minutes before starting, or place them in warm water for 5 minutes. This simple step ensures a silky, lump-free filling in your copycat Kimmy Kreations sweet potato pie recipe.
3. The Food Processor Is Your Secret Weapon
Many sweet potato pie recipes result in stringy, fibrous fillings because the sweet potatoes aren’t processed enough. Using a food processor breaks down those fibers completely, creating the signature velvety texture that makes learning how to make Kimmy Kreations sweet potato pie worth the effort. Don’t skip this step!
4. Gentle Whisking Prevents Cracking
When combining your filling ingredients, whisk slowly and gently by hand. Over-whisking or using an electric mixer incorporates too much air, which causes the pie to puff dramatically during baking and then crack as it cools. A smooth, crack-free surface is the hallmark of a professionally made sweet potato pie recipe.
5. The Wobble Test Is Your Best Friend
Don’t overbake! Your pie is perfect when the edges are set and puffed, but the center still jiggles slightly like Jell-O when you gently shake the pan. It will continue to set as it cools. Overbaking creates a dry, cracked texture instead of the creamy custard that makes this easy sweet potato pie recipe so irresistible.
6. Blind Baking Prevents Soggy Bottom Syndrome
Par-baking your crust with weights creates a moisture barrier that keeps the bottom crisp even after adding the wet filling. Press those pie weights firmly against the sides of the crust to prevent shrinking. This technique is essential for achieving the perfect crust-to-filling ratio in your copycat Kimmy Kreations sweet potato pie recipe.
7. Patience During Cooling Yields Better Results
Resist the temptation to slice into your pie while it’s still warm! Allowing it to cool completely for several hours (or even overnight in the refrigerator) lets the custard set properly, making cleaner slices and developing the full flavor profile. When learning how to make Kimmy Kreations sweet potato pie, remember that good things come to those who wait.
Storage and Reheating Guidance
Store your sweet potato pie covered with plastic wrap or foil in the refrigerator for up to 4 days. For best results, bring slices to room temperature before serving, or warm individual slices in the microwave for 15-20 seconds.
Kimmy Kreations Sweet Potato Pie Recipe

If you've been searching for an easy sweet potato pie recipe that rivals the famous Kimmy Kreations version, you're in the right place! This copycat Kimmy Kreations sweet potato pie recipe delivers that signature silky-smooth filling with warm spices that make every bite feel like a warm hug. Learning how to make Kimmy Kreations sweet potato pie at home is easier than you think, and the results are absolutely worth it.
Ingredients
- 2 pounds whole sweet potatoes (raw weight)
- ¾ cup granulated sugar
- 2 large eggs (room temperature)
- 1 cup evaporated milk
- 2 teaspoons vanilla extract
- ¾ teaspoon ground cinnamon
- 1 teaspoon ground ginger
- ¼ teaspoon ground nutmeg
- Small pinch of salt (optional)
Instructions
Step 1: Roast the Sweet Potatoes
Preheat your oven to 375°F (190°C). Pierce the 2 pounds of sweet potatoes several times with a fork to allow steam to escape. Place them on a foil-lined baking sheet and roast for about 1 hour, or until they're very tender when pierced. Roasting concentrates the natural sugars and removes excess moisture-this is the secret to avoiding a watery, soggy pie! Let them cool for about 30 minutes before handling.
Step 2: Prepare and Blind-Bake the Crust
While the sweet potatoes cool, prepare your pie crust. Preheat your oven to 425°F for homemade crust or 400°F for store-bought. Line the unbaked crust with parchment paper and fill with pie weights or dried beans, pressing them firmly against the sides. Blind bake for 20 minutes until the crust is lightly golden and crisp. Remove the weights and parchment carefully-this par-baked crust will prevent sogginess later. Keep the oven at 400°F for baking the filled pie.
Step 3: Make the Silky Filling
Once the sweet potatoes are cool enough to handle, peel off the skins (they should slip right off). Place the sweet potato flesh in a food processor and pulse until completely smooth and creamy-this eliminates any fibrous texture. Transfer about 2½ cups of the pureed sweet potatoes to a large mixing bowl.
Step 4: Combine the Ingredients
Add the granulated sugar, room-temperature eggs, evaporated milk, vanilla extract, cinnamon, ginger, nutmeg, and optional salt to the sweet potato puree. Whisk gently until smooth and well combined. Avoid over-whisking or using a blender at this stage, as incorporating too much air can cause the pie to puff up, crack, or lose its creamy texture during baking.
Step 5: Assemble and Bake
Pour the filling into the warm par-baked crust. Gently shimmy the pie dish to settle the filling evenly, and smooth the top with a spatula if desired. Bake at 400°F for 15 minutes, then reduce the temperature to 350°F and continue baking for an additional 40 minutes. The pie is done when the edges are set and puffed, but the center still has a slight wobble like Jell-O. If the crust edges brown too quickly, cover them loosely with foil.
Step 6: Cool and Serve
Remove the pie from the oven and let it cool completely on a wire rack for several hours-this allows the custard to set properly. Slice and serve with a generous dollop of whipped cream. Store any leftovers covered in the refrigerator.
Notes
Store your sweet potato pie covered with plastic wrap or foil in the refrigerator for up to 4 days. For best results, bring slices to room temperature before serving, or warm individual slices in the microwave for 15-20 seconds.
Nutrition Information:
Yield:
4Serving Size:
1Amount Per Serving: Calories: 150
Common Queries and FAQs
When you give this Kimmy Kreations Sweet Potato Pie Recipe a try, you might have a few questions. Don’t worry-we’ve rounded up answers to the most common ones to help you out.
Q: Can I use canned sweet potato puree instead of fresh sweet potatoes?
A: While fresh roasted sweet potatoes give the best flavor and texture for this Kimmy Kreations sweet potato pie recipe, you can use canned sweet potato puree in a pinch. Use about 2½ cups (approximately 29 ounces) of canned puree. Make sure it’s 100% sweet potato with no added sugar or spices, and drain any excess liquid before using.
Q: Why is my sweet potato pie runny?
A: A runny sweet potato pie usually results from not baking it long enough or using boiled (rather than roasted) sweet potatoes. Make sure to roast your sweet potatoes to remove excess moisture, and bake the pie until the center has just a slight wobble. It will firm up as it cools completely.
Q: Can I make this easy sweet potato pie recipe ahead of time?
A: Absolutely! This copycat Kimmy Kreations sweet potato pie recipe actually tastes better the next day as the flavors meld together. Bake the pie up to 2 days in advance, let it cool completely, cover it, and refrigerate. Bring to room temperature or warm slightly before serving.
Q: What’s the difference between sweet potato pie and pumpkin pie?
A: Sweet potato pie has a denser, creamier texture and a more complex, earthy-sweet flavor compared to pumpkin pie. Sweet potatoes are naturally sweeter and have a different starch content. When learning how to make Kimmy Kreations sweet potato pie, you’ll notice the roasting method creates caramelized notes that pumpkin simply doesn’t have.
Q: Can I freeze sweet potato pie?
A: Yes! This sweet potato pie recipe freezes beautifully for up to 2 months. Wrap the cooled pie tightly in plastic wrap, then aluminum foil. Thaw overnight in the refrigerator before serving. The texture remains creamy and delicious after freezing.
Q: Do I have to use evaporated milk?
A: Evaporated milk contributes to the signature richness and creamy texture of this easy sweet potato pie recipe. You can substitute whole milk or heavy cream, but evaporated milk provides the best authentic flavor and consistency that makes this copycat Kimmy Kreations sweet potato pie recipe so special.
Q: How do I prevent my pie crust from burning?
A: If the edges of your crust are browning too quickly during baking, loosely cover them with strips of aluminum foil or use a pie crust shield. Check the pie halfway through baking and protect any areas that are darkening faster than the rest.
This Kimmy Kreations sweet potato pie recipe brings together the perfect combination of roasted sweet potatoes, warm spices, and a buttery crust for a dessert that’s truly unforgettable. Whether you’re making this copycat Kimmy Kreations sweet potato pie recipe for Thanksgiving, Christmas, or just because you’re craving something special, the results are always impressive.
Now that you know how to make Kimmy Kreations sweet potato pie with this easy sweet potato pie recipe, you’ll have a go-to dessert that family and friends will request again and again. So grab those sweet potatoes, preheat your oven, and get ready to create some delicious memories!
We’d love to hear how this recipe turns out for you! Give it a try, then drop a comment below to share your thoughts and tips with us.
You can also follow us on Pinterest, and YouTube for more delicious updates and kitchen inspiration. Your feedback and support mean the world to us!